Monday, November 26, 2012

Petite Purse Die Box

 
I was REALLY excited to get the new purse die in my recent Stampin' Up! order, but with so many holiday obligations, I wasn't sure when I'd find the time to or occasion to make pretty, girly purses. Then I realized that so many of our container dies can be made into boxes but cutting multiples and then cutting down and assembling them in creative ways. So I decided to take a stab at this one and it turned out pretty cute. I learned a few things along the way and am excited to try it again and refine my technique. This time I will document what I did so I can tell you all about it!  Until then, take a look at this one, made with our Petite Purse Bigz L die run through our Big Shot. I used Cherry Cobbler and Very Vanilla cardstock, some retired ribbon (so glad I bought this...I never regret owning ribbon and I always find uses for it...in fact, this ribbon taught me two things: use the things I buy more quickly so that if I love it, I can buy more before it's too late, and two, if you love something, buy it and you will find a use for it!), our Be of Good Cheer designer series paper, neutrals designer buttons, and linen thread, and our new snowflake die (I can never resist snowflake products. Oh, and lots of sticky strip. Sticky strip is your friend in this project! Come back soon, and I will try to have a tutorial posted on how to create this box yourself.

 This is a view of the inside.  I think next time I'm going to line the inside with patterned paper.  Or make the whole box from patterned paper.  I was worried it wouldn't be sturdy enough but when it's fully and with the use of sticky strip, it's pretty solid.  The container holds about 20 Hershey's Kisses, and still folds shut nicely.  I'm thinking these will be my gifts for my co-workers this year.

 
The next project I wanted to share with you is a greeting card I made using the same Be of Good Cheer designer series paper.  But this time, I followed a sketch from the June 2012 CardMaps.The owner of that site, Becky Fleck, does a wonderful job of providing free scrapbook page and card layout sketches.  In addition to the DSP, I used the Ornament Keepsakes bundle from our Holiday Mini catalog, Very Vanilla Ribbon, Pearl Basic Jewels, and cardstock in Gumball Green, Cherry Cobbler and Very Vanilla.

Wednesday, June 6, 2012

I decided to create some summery birthday cards for friends from Bible Study.  I found our Summer Silhouettes stamp set and our Floral District Designer Series Paper to be the perfect inspiration.  I love the summery combination of Lucky Limemade, Daffodil Delight and Calypso Coral.  I added a bit of textural interest with a stamped, punched out butterfly (Elegant Butterfly Punch), 3/8" Ruffled Ribbon, and some bling (our Rhinestone Basic Jewels).  I find that our sticky strip is a perfect no-hassle way to stick down the ribbon permanently.

Tuesday, May 1, 2012

My grandmother LOVES the color blue and flowers, so when creating this card for her birthday, I wanted to incorporate those elements.  Lucky for me, I have the fun Mixed Bunch stamp set and the coordinating Blossom Punch to stamp and then punch my image with.  As you might be able to tell, I wet embossed the blue flower.  You might be wondering how I did that...it's pretty easy...ink your stamp with Versamark ink followed by any color classic ink pad, then stamp your image onto paper.  Working quickly, apply clear embossing powder and heat with our heat tool. I love using colored embossing powder when its available because the image is more solid, but this method works when you don't have the right color at your fingertips. I also used the Versamark pad to create watermarks on the Crumb Cake cardstock.  The leaves behind the flower image are from our Little Leaves Sizzlet.  I also used our Pearl Basic Jewels to fill in all the polka dots on the center of the flower.  The scallop trim was cut using our Tasteful Trim Bigz XL die.

Thursday, April 19, 2012

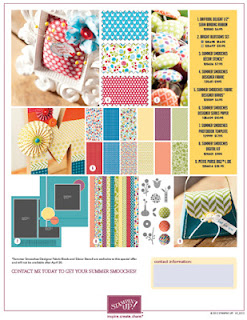
Summer Smooches!!!


I just placed an order for some things from Stampin' Up! and I can't wait to get them. I needed to order some supplies for working some bridal shower invites (to be posted after the bride-to-be has seen then) and decided to throw in some of the awesome Summer Smooches line that is available during April! I can't wait till they arrive so I can play with them. Here's what I'm drooling over!


First, the series contains some of my most favorite colors all rolled up into one suite: Daffodil Delight, Real Red, Tempting Turquoise, Lucky Limeade, Island Indigo, Tangerine Tango, Rich Razzleberry.

Those of you who love to use fabric in your crafting will LOVE our Designer Fabric, which coordinates with this suite.

In addition, any crafter (paper or otherwise), will love our Fabric Designer Brads - which are beautiful and ONLY available in April.


And those of you who dabble in digital will be delighted by both of our offerings: the Summer Smooches Photobook Template and the Digital Kit (both are My Digital Studio downloads).

Here's the details:Item #125495 Bright Blossoms Wood-Mount Set $16.95
Item #125497 Bright Blossoms Clear-Mount Set $12.95
Item #125409 Summer Smooches Designer Paper $10.95
Item #125583 Daffodil Delight 1/2" Seam Binding Ribbon $10.95
Item #125411 Summer Smooches Fabric $9.95

Item #125589 Summer Smooches Fabric Brads* $6.95
Item #125626 Summer Smooches Décor Stencil* $7.95
Item #125606 Petite Purse Bigz L Die $32.95
Item #129919 Summer Smooches Photobook Template $17.95
Item #129601 Summer Smooches Digital Kit $9.95


*The Summer Smooches Fabric Designer Brads and the Summer Smooches Decor Stencil will only be available during the month of April. They will NOT be in the new catalog.


You may order from my Stampin' Up! website 24/7 or by contacting me directly. My e-mail link is at the top of the screen.

Thursday, December 9, 2010

Bing Crosby Challenge


In the spirit of the holidays, my demonstrators group decided to look to a Christmas CD album cover for our inspiration. We chose to use his Merry Christmas CD, which has a retro feel, a centered focal point, lots of white space and a red, green, and black color scheme. I decided to mimic the centered, circular focal point and use the red, green and black colors as a jumping point. I was a bit intimidated about using black on a Christmas card. I know, Iknow...it's classic, it can be elegant, and it goes with a lot. But it also somehow seems morbid. But I was determined to get over it, and since I absolutely love our Love Letter designer series paper, to turned to it as my jumping off point. I opted for Very Vanilla over white Very Vanilla was used in the patterned paper, and then I opted to tone down the bright Christmassy red and green to the more sublte Cherry Cobbler and Garden Green. I wanted the black to be a bigger proportion of color, and I wanted to center the focal image just as they did on the CD. I used my Two-Step Bird Extra-Large punch to punch out the leaves for the wreath and then trimmed down the stems as I laid it out in a circle. I topped it off with some Cherry Cobbler brads for some cute berries, and voila! What do you think of when you see this CD cover? How does it inspire you? I'd love to see your work, please leave a comment with a link if you are inspired to do so!

Friday, December 3, 2010

Thursday, December 2, 2010

Color Challenege - Poppy Parade, Old Olive, and Concord Crush

My demonstrator's group has been participating in challenges these past few weeks, and today our challenge was to use Poppy Parade, Concord Crush and Old Olive. This was a fun chance to use two of this year's In Colors, with one of my "go to" classics!

I thought the colors lent themselves well to a Christmas theme...the richness of the Concord Crush makes me think of royalty or special occasions and the Poppy Parade paired with the Old Olive create a modern twist of the standard red and green for this time of year.

The card base was embossed with our Petals-a-Plenty embossing folder and the poinsettia stamp is retired from last year's holiday mini (Berry Christmas)...this is still one of my favorite sets! I topped it off with our In Color Ribbon and our new adhesive pearls.

Happy stamping!!!
Pin It button on image hover