Thursday, December 9, 2010

Bing Crosby Challenge


In the spirit of the holidays, my demonstrators group decided to look to a Christmas CD album cover for our inspiration. We chose to use his Merry Christmas CD, which has a retro feel, a centered focal point, lots of white space and a red, green, and black color scheme. I decided to mimic the centered, circular focal point and use the red, green and black colors as a jumping point. I was a bit intimidated about using black on a Christmas card. I know, Iknow...it's classic, it can be elegant, and it goes with a lot. But it also somehow seems morbid. But I was determined to get over it, and since I absolutely love our Love Letter designer series paper, to turned to it as my jumping off point. I opted for Very Vanilla over white Very Vanilla was used in the patterned paper, and then I opted to tone down the bright Christmassy red and green to the more sublte Cherry Cobbler and Garden Green. I wanted the black to be a bigger proportion of color, and I wanted to center the focal image just as they did on the CD. I used my Two-Step Bird Extra-Large punch to punch out the leaves for the wreath and then trimmed down the stems as I laid it out in a circle. I topped it off with some Cherry Cobbler brads for some cute berries, and voila! What do you think of when you see this CD cover? How does it inspire you? I'd love to see your work, please leave a comment with a link if you are inspired to do so!

Friday, December 3, 2010

Thursday, December 2, 2010

Color Challenege - Poppy Parade, Old Olive, and Concord Crush

My demonstrator's group has been participating in challenges these past few weeks, and today our challenge was to use Poppy Parade, Concord Crush and Old Olive. This was a fun chance to use two of this year's In Colors, with one of my "go to" classics!

I thought the colors lent themselves well to a Christmas theme...the richness of the Concord Crush makes me think of royalty or special occasions and the Poppy Parade paired with the Old Olive create a modern twist of the standard red and green for this time of year.

The card base was embossed with our Petals-a-Plenty embossing folder and the poinsettia stamp is retired from last year's holiday mini (Berry Christmas)...this is still one of my favorite sets! I topped it off with our In Color Ribbon and our new adhesive pearls.

Happy stamping!!!

Monday, November 29, 2010

Punch Circle Christmas Tree

The last card I posted was inspired by a card I received from another Stampin' Up! demonstrator. Tonight's card is inspired by a commercially produced card I received from a co-worker a few years ago. It was a tree made of gold, silver and gold foil dots and then accented with shiny snowflake a a script font. I chose Cherry Cobbler, Garden Green and Soft Suede as my color combo.
I decided to try my hand a homemade version using various sizes of punched circles. A lot of SU!'s smaller circle punches will work for this...I also used the circles from owl punch to get a good assortment of sizes. The tree trunk is half of punched piece from the modern label punch. I accented it with SU!'s brilliant rhinestone brads and holiday sentiment from the Four the Holidays stamp set!

This would be a great card for mass production...especially for those of you with eager children at home...they will have fun making all these punches for you!

Please click HERE to order 24/7!!!

Thursday, November 25, 2010

Card Inspiration Challenge


Ahhh....it's Thanksgiving Day! There's nothing like waking to the smell of turkey in the oven with the promise of a fire in the fireplace, good times with family, amazing food & relaxation. It's also the official start to the holiday season which, for many of us, is the busiest time all year...friends & family to visit, church, work & other social obligations, shopping, baking, wrapping, mailing holiday cards, etc. And if you're like me, you love the coziness & sentimentality of handmade touches.

This holiday, make things easier on yourself, and enjoy your hobbies while still crossing things off that long to-do list. This week, I challenge you to create a holiday card (or card for any other upcoming event) that is inspired by a card you have received from someone else this year. Perhaps you like the layout of the card, or the color combination they used...go for it! Copy it...don't spend time reinventing the wheel...just take it and run with it.

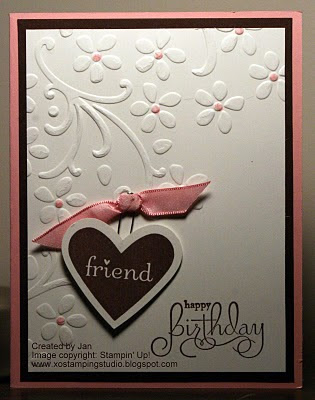
This year, I was lucky enough to receive this pretty pink and brown birthday card from my friend Jan, which was the inspiration for my blue and white holiday card above. The layout, dry embossing, and punched & stamped image are the same, but with a wintery twist! Thanks, Jan, for a great piece of inspiration.


Tuesday, October 19, 2010

Some Serious Swapping: Home for Christmas

This is the other Christmas card I did for the swap I mentioned in my post yesterday. The requirements were to use three embellishments, so this card has the 5/8" satin ribbon in basic black, embossing powder, and a clip from our Clips Assortment. I have fallen in love (no pun intended) with our Love Letters designer series paper, so I was looking for a way to incorporate that into my card. That drove the color scheme of Very Vanilla, Basic Black and Cherry Cobbler. Multiple layers and the ticket corners (made with our ticket corner punch) add some detail to this card, which was pretty easy to make! I like to stamp the insides, too...for a little extra surprise.


Happy stamping!

Monday, October 18, 2010

Some Serious Swapping: Season of Friendship


I've been doing some serious swapping this fall and having a blast. It has been fun to create cards & also fun to get some beautiful and inspiring cards back! Thanks to everyone who participated in the same swaps as me...you did great work.

This card is one that I created for a Christmas swap. I stamped the tree (from the Season of Friendship stamp set) in Early Espresso ink onto Early Espresso cardstock and then cut it out by hand with my Paper Snips.

Next I cut a rectangle of Whisper White cardstock, and stamped the snowflakes (also from Season of Friendship) on it with VersaMark ink, sprinkled with Iridescent Ice embossing powder and heat set it. Then I mounted that rectangle on a slightly larger rectangle of Cherry Cobbler cardstock and accented with two Cherry Cobbler brads from the Regals brad assortment pack.

That was all mounted on the card, which I had made by mounting a large rectangle of our Candy Cane Christmas designer series paper adorned with Early Espresso ribbon onto a card made from Early Espresso cardstock. Then I adhered down the tree, stamped the cheery red bird (also from the Season of Friendship set) and called it done. I think it turned out pretty cute. I'm going to try one using fall colors, be sure to check back and look for that!


Also, check back tomorrow to see the other card I did for this Christmas swap! Happy Stamping.

Friday, October 15, 2010

Get Well!!! -

A friend of ours is a HUGE dog fan...she always has at least two romping around her home, sometimes more. So when she had to have a knee replacement I knew exactly which set to start with. I just love this Wellness Wishes set..three great options for well wishes to loved ones. I had fun creating this simple card with Chocolate Chip, Summer Sun and Whisper White cardstock, then accenting it with the image stamped in Chocolate Chip ink, and all tied together with Chocolate Chip satin ribbon.

Monday, October 11, 2010

Sympathy Card Featuring Great Friend Stamp Set


A friend of mine recently hired me to create a sympathy card for her neighbor whose husband had passed away. She had mentioned that the neighbor wanted his funeral to be a celebration of his life rather than a somber gathering for his death. So I thought this card was a nice mix uplifting sophistication while still maintaining a tone of seriousness.
The butterfly and stem of leaves both came from the Great Friend stamp set on page 122 of our current catalog. I wasn't sure if the neighbor is religious or not, so I provided two inserts (one with just the leaves stamped on the corners and one with a religious quote) so that she could customize the card before signing and sending it. The "With Sympathy" stamp came from Teeny Tiny Wishes.
The colors I used are Elegant Eggplant, More Mustard, Garden Green, and Early Espresso. The patterned paper is from our Regals Designer Series paper pack and is perfect for lots of fall projects.
Please click HERE to order 24/7!!! Supplies used on this card:

Cardstock: Early Espresso, Whisper White
Stamp Sets: Great Friend, Teeny Tiny Wishes
Ink: Elegant Eggplant, Garden Green
Other: Early Espresso 5/8" satin ribbon, Regals designer series paper, dimensionals adhesive and our paper snips for handcutting the stamped butterfly image

Saturday, October 9, 2010

Happy H-owl-oween


I just love this owl...there is something very Edgar Allen Poe-ish about it and it could be use for other things than Halloween. I loved using straying a bit from the traditional black and orange Halloween colors. This card uses Rich Razzleberry, Basic Gray, Basic Gray, So Saffron, and Cajun Craze.


The stamped owl comes from the awesome Dark & Dreary stamp set found in our Holiday Mini Catalog. The greeting comes from one of my favorite "go to" sets called "Teeny Tiny Wishes" and the little bit of grunge comes from the Wonderfully Worn background stamp. I found myself playing with my spider web embossing folder again and tried out a technique to ruffle ribbon that I'm seeing everywhere. I created the tag by punching my XL Decorative Label punch one time on each of three colors. Then I cut two of the punchies in half, adhered them behind each other, adhered them behind the so saffron and trimming the little "tails" that peeked out. So easy and add some interest. The brad is from our Regals collection of brads, which are all the perfect colors for fall projects.


Please click HERE to order 24/7!!! Supplies used on this card:


Cardstock: Basic Gray, So Saffron, Cajun Craze, Rich Razzleberry
Stamp Set: Dark and Dreary, Wonderfully Worn, Teeny Tiny Wishes
Ink: Basic Black
Other: Basic Black 5/8" grosgrain ribbon, rich razzleberry brad, XL decorative label punch, dimensionals adhesive, spider web textured impression embossing folder, Big Shot machine

Thursday, October 7, 2010

Dark & Dreary Tag Card


I just can't get enough of this Dark & Dreary set...which is so unlike me...I'm usually a "cute" Halloween person, not a spooky/creepy Halloween person. But I just love the dirty, grungy feel of this vintage Halloween set.

This card was inspired by fellow blogger Patty Lynn...check out my muse HERE.

I didn't have the raven single stamp that she used, so I chose the square Happy Halloween stamp from the Dark & Dreary set. I substituted 5/8" grosgrain basic black ribbon for the lace trim, and a build-a-brad for the regular brad. She used our new yellow, Daffodil Delight and I used So Saffron instead.

I loved making the ruffle with our new waffle paper. It's easy to work with & adds fun dimension to your project. And I loved the chance to play with my Big Shote: both the spider web embossing folder and the two tags die were used on this project.

Please click HERE to order 24/7!!! Supplies used on this card:

Cardstock: Rich Razzleberry, Old Olive, Basic Black, So Saffron
Stamp Set: Dark and Dreary, Wonderfully Worn (to create the dirty spots)
Ink: Basic Black
Other: Basic Black 5/8" grosgrain ribbon, dimensionals adhesive, build-a-brad, 1/2" circle punch, waffle paper, spider web textured impression embossing folder, Big Shot Machine, two tags die.

Tuesday, October 5, 2010

Dark & Dreary Halloween Card


If you know me at all, you know that besides clowns, one of my biggest fears is spiders! Yes, I can handle all forms of rodents, snakes and even most bugs, but spiders are not one of them! Ewww..I know they are good for the earth, but anything with 8 legs and 8 eyes is just beyond creepy. I can't even bring myself to touch a picture of them...so I am very surprised to find out how much love my Spider Web embossing folder and this Dark and Dreary stamp set that contains, of all things, a spider stamp. Coincidentally...when I got done stamping this card, I found a giant spider in my bathroom and, two hours later, I mustered up enough courage to kill it.


Please click HERE to order 24/7!!! Supplies used on this card:


Cardstock: Crumb Cake, Basic Black, Basic Gray

Stamp Set: Dark and Dreary

Ink: Basic Gray

Other: Basic Black 5/8" grosgrain ribbon, build-a-brad, 1/2" circle punch, dimensionals adhesive, spider web textured impression embossing folder, Big Shot machine

Saturday, August 14, 2010

Bouquet Bunch - AVAILABLE ONLY UNTIL 8/31/10

This was one of my "must have" sets from our Summer mini catalog, which is set to retire on August 31st. I just love how all the pieces can be interchanged to match whatever your heart desires. I thought this would be a fun fall card for the upcoming season!

Please click HERE to order 24/7!!! Supplies used on this card:
Cardstock: Early Espress and Crumb Cake
Stamp Set: Bouquet Bunch
Ink: Early Espresso, More Mustard, Cherry Cobbler, Cajun Craze, Garden Green
Other: Early Espresso 5/8" satin ribbon, Regals Designer Series Paper, Dimensionals adhesive


Friday, August 13, 2010

Happy Birthday Dawn!!!

Today is my upline's birthday and to celebrate, I'm posting a card in her honor! This card was made primarily with my Big Shot toys and I love the whimsical feel! The cupcake was cut using our Big Bold Cupcakes sizzlet dies. The cake part is cut from Early Espresso cardstock (one of our YUMMY new colors) and then stamped on with Early Espresso ink using our A to Z background stamp for a little bit of added somethin'-somethin'. The polka dot textured piece of Tempting Turquoise was created with our Perfect Polka Dots embossing folder and the swirly Pumpkin Pie piece was created with our Backgrounds 1 Texturz Plates. You can't tell it from the photo but the white frosting is heat embossed to give it a little texture and bling. And to create the pink sprinkles, I ran the Rose Red cardstock through the Big Shot with the frosting die, then ran the Whisper White cardstock through with the same die, then ran the Whisper White through again, this time with the polka dot die from the Big Bold Cupcakes set. The heart on top is also from the Big Bold Cupcakes set. The sentiment is from our very versatile Teeny Tiny Wishes stamp set.
Please click HERE to order 24/7!!!

Thursday, August 12, 2010

Razzle Dazzle


Here's a quickie that could easily be adapted to any color scheme...I'm thinking weddings, baby showers, or making several as a gift set in the recipients favorite colors...the sky is the limit on this simple the elegant card. You can't tell it from the photo, but I did heat emboss the black flowers and the sentiment, which gives it a little bit more class in real life. I'm also considering adding a few pearls or rhinestones to the flowers...what do you think? Happy stamping...

Please click HERE to order 24/7!!! Supplies used on this card:
Cardstock: Tempting Turquoise, Whisper White and Basic Black
Stamp Sets: Razzle Dazzle (flowers), Because I Care - hostess (sentiment)
Other: Black craft ink pad, Clear Embossing powder

Thursday, August 5, 2010

All a Flutter - Summer Mini


This is another single stamp from the summer mini and I just love it for it's versatility. Butterflies are so popular right now...in clothing, on accessories, in home decor & of course, in the crafting world. And it's no wonder...they are natural, somewhat feminine, come in all kinds of colors and can be beautiful, fragile or whimsical.

On this card, I chose to use the stamp to create a background, by inking it with Versamark watermarking ink and then stamping it randomly. I also stamped it once with Early Espresso craft ink and then topped it with some clear embossing powder & heated it up to get a textured butterfly that I could then ink up with sponge daubers and some classic ink (So Saffron and Pumpkin Pie).


Please click HERE to order 24/7!!! Supplies used on this card:
Cardstock:Crumb Cake - #120953 for 8.5"x11" or #119929 for 12"x12"
Early Espresso - #119686 for 8.5"x11" or #119691 for 12"x12"
Whisper White - #100730 for 8.5"x11" or #119952 for 12"x12"
So Saffron - #105118 dor 8.5"x11" or #119947 for 12"x12"

Ink:
Early Espresso Craft ink - you'll have to create your own using a Early Espresso craft ink refill (#121606) and an uninked pad (#122265)
Pumpkin Pie Classic Ink - #105216
So Saffron Classic Ink - #105213
Versamark - #102193
Stamp Set:
All a Flutter - #118284
Because I Care (thank you) - #118384 for woodmount or #120118 for cling mount - you can earn this set free by hosting a $150 workshop.
Tools:Scallop Edge Border Punch - #119882
Heat Tool - #100005
Powder Pals - #102197

Other:
Clear Embossing Powder - #109130


Tuesday, August 3, 2010

Because I Care - Hostess Set


Do you know what is great about being a hostess? Well, besides getting to spend an evening stamping with friends? You also get lots of cool benefits, like chances to earn free stamp sets & also free products of your choice.


This year's hostess sets, released in the newest catalog and are AMAZING...you will want to hostess several time just to get them all, I promise. The first one I want to show you the "Because I Care" set, which can be yours when you hostess a workshop totalling $150 or more. I was drawn to this set because my aunt loves hydrangeas and it made me think of her...but others reasons to love this set are the two greetings it comes with as well as a little border stamp. Doesn't get better than that! This card could be easily adapted to fit any color scheme...perhaps wedding colors? Or mom's favorite colors? I think this would look stunning with black, white and tempting turquoise.


Please click HERE to order 24/7!!! Supplies used on this card:


Cardstock:

Basic Black - #121045 for 8.5"x11" or #119922 for 12"x12"
Whisper White - #119952 for 8.5"x11" or #1109025 for 12"x12"
Rich Razzleberry - #119942 for 8.5"x11" or #115316 for 12"x12"

Ink:Basic Black Craft - #102192


Stamp Set:
Because I Care - #118384 - but remember, the only way to get this is to hostess an order over $150...contact me, I can help you do that very easily!

Tools:
Big Shot - #113439
Vintage Wallpaper Texture Impressions Embossing Folder - #120175
Other:
Clear Embossing Powder - #109130
Heat Tool - #100005
5/8" satin ribbon in Rich Razzleberry - #119752

Monday, August 2, 2010

Motorcyle - Summer Mini Catalog


Can you believe it's already the beginning of August? Where did the summer go? Before you know it, it will be time for fall foods, pumpkin patches, and Halloween costumes. It also means there is only a month left to order from the summer mini catalog. One of my favorite stamps in that catalog is the motorcycle, because the men in my life love their bikes, and this makes stamp makes it easy to create masculine Father's Day and birthday cards. Another fun thing about this stamp is that it's a single stamp, which means it's very easy on the wallet & doesn't take up much storage.


I stamped the image in Not Quite Navy craft ink and then heat embossed it with clear embossing powder to give it some dimension and shine. Next, I used our Color Sprintzer tool to splash a little Early Espresso ink on there to age it. Then I layered it onto cardstock, some of which was textured with our Square Lattice embossing folder, which gives it a nice masculine texture. I accented it with a few brads and some ribbon & I was good to go.
You could easily make this more classic by going with Basic Black, Whisper White, and Basic Gray; or you could go sportier by adding a splash or Pumpkin Pie or Daffodil Delight, or customize it to match your loved ones' bike. Whatever you do, don't miss out on this versatile single stamp!

Please click HERE to order 24/7!!! Supplies used on this card:

Cardstock:
Crumb Cake - #120953 for 8.5"x11" or #119929 for 12"x12"
Early Espresso - #119686 for 8.5"x11" or #119691 for 12"x12"
Not Quite Navy - #101722 for 8.5"x11" or #119933 for 12"x12"

Ink:
Not Quite Navy Craft ink - if you don't have a craft pad, you'll have to create your own using a Not Quite Navy craft ink refill (#103131) and an uninked pad (#122265)
Early Espresso Marker - #119680

Stamp Set:
Motorcycle - #117657
Tools:
Ticket Corner Small Punch - #119867
Big Shot - #113439
Square Lattice Textured Impressions Embossing Folder - #119976
Heat Tool - #100005
Powder Pals - #102197

Other:
Clear Embossing Powder - #109130
Crumb Cake Brads - in the Neutrals Brad mix - #119736
5/8" satin ribbon in Early Espresso - #119753

Saturday, May 15, 2010

Last Chance - Kind and Caring Thoughts


This beautiful set was a favorite of mine the instant I saw it in the current catalog. It is a hostess set for this year, Kind and Caring Thoughts, which means it may retire with the current catalog (the last day of June). It also means the only way to get it is to hostess a qualifying party. So if you, like me, just "have" to have this set, contact me and I help you book a workshop that can earn you this set.
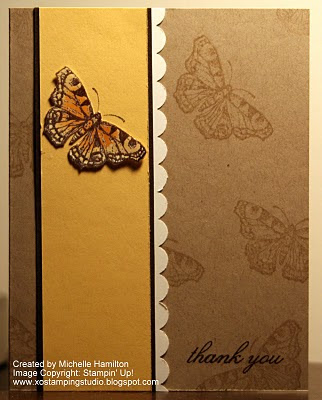
I created this card for my mother-in-law who had outpatient surgery. I thought the blues and browns would be perfect for her. And I love the feminine details of the butterfly, ribbon and scallop trim without being too girly.
Please click HERE to order 24/7!!! Supplies used on this card:

Patterned Paper: Bella Blue - #113974

Cardstock:Kraft - #102125 for 8.5"x11" or #107070 for 12"x12"
Very Vanilla - #105328 for 8.5"x11" or #106531 for 12"x12"
Not Quite Navy - #101722 for 8.5"x11" or #107095 for 12"x12"
Chocolate Chip - #102128 for 8.5"x11" or #107102 for 12"x12"

Ink:
Not Quite Navy Craft - #103227
Chocolate Chip Classic - #100908

Stamp Set: Kind and Caring Thoughts - #115324

Tools:
Scallop Trim Punch - retired, but we have other beautiful border punches that would work just as well. Check out the Scallop Edge #112091 or the Eyelet Border #113692.
Big Shot - #113439
Beatiful Wings Embosslit - #11838
Heat Tool - #100005
Other:Clear Embossing Powder - #109130
Sending Love Epoxy Brads in Chocolate Chip - #117272
5/8" satin ribbon in Chocolate Chip - #117287


Sunday, May 9, 2010

Happy Birthday! For All You Do


This stamp set (For All You Do) was the first one I got as a demo and I still love the versatility of it. Today, I used it create birthday cards for some girlfriends. I loved the combination of patterned papers, stamping, bling and ribbon to create a fresh, funky card for some special people in my life.


Please click HERE to order 24/7!!! Supplies used on this card:

Stamps:For All You Do - #115360
Teeny Tiny Wishes - #115370

Cardstock:
Whisper White - #100730 (for 8.5"x11") or #106529 (for 12"x12")
Chocolate Chip - #102128 (for 8.5"x11") or #107102 (for 12"x12")
Old Olive - #100702 (for 8.5"x11") or #106544 (for 12"x12")
Patterned Paper: Sweet Pea Designer Series Paper (retired)
Ink:So Saffron Classic - #105213
Rose Red Craft - #101545
Old Olive Classic - #102277
Other:Rhinestone Brads - #113144
5/8" Satin Ribbon (Chocolate Chip) - #117287


Wednesday, May 5, 2010

Sweet Treats Skittles!


Did you know that Real Red, Only Orange, Yoyo Yellow and Elegant Eggplant perfectly match four of the five colors of regular flavored Skittles? And, that Skittles fit in our Sweet Treat cups? So exciting...I figured that out this weekend when making this birthday card for my soon-to-be-five-year-old friend, Payton! Skittles are her favorite candy, so I think it will be a hit.

Cardstock:
Real Red - #102482 (for 8.5"x11) or #106545 (for 12"x12")
Only Orange - #102837 (for 8.5"x11) or #107107 (for 12"x12")
YoYo Yellow - #102824 (for 8.5"x11) or #107108 (for 12"x12")
Elegant Eggplant - #105126 (for 8.5"x11) or #107085 (for 12"x12")
Whisper White - #100730 (for 8.5"x11") or #106529 (for 12"x12")

Ink: Real Red Classic pad - #103133

Tools: 1-3/4" circle punch - #112004

Other:
Sweet Treat Cups - #116802
Real Red 5/8" satin ribbon - #117286
Something Sweet Stamp Set (retired)

Saturday, May 1, 2010

Bling Challenge


My demostrators group decided to use BLING as our challenge for this week. There are plenty of blingin' products to choose from in our catalog including Iridescent Ice embossing powder, metallic cardstock , foiled patterned paper, flat-backed pearls and rhinestone brads. I decided to use the Rhinestone Brads because I've had them since I became a demonstrator and haven't ever used them. They come in a pack of 84, with 28 each of three different sizes, so you will find the perfect one for whatever you are working on. I chose clear, but they also have four combo packs that offer a great assortment of colors in round or square. I also used the Lattice Die on these cards to create two different effects. On the second card down, I used the "insides" of the lattice (the football shape you'd normally discard) to create the layers of my flower. I ended up having so much fun I created two cards. I can't decide which I like better...what do you think?


Enjoy!

Please click HERE to order 24/7!!! Supplies used on this card:
Both cards use:
Cardstock:Rose Red - #102544 for 8.5"x11" or #107086 for 12"x12"
Pumpkin Pie - #105717 for 8.5"x11" or #107100 for 12"x12"
So Saffron - #105118 for 8.5"x11" or #107088 for 12"x12"
Old Olive - #100702 for 8.5"x11" or #106544 for 12"x12"
Whisper White - #100730 for 8.5"x11" or #106529 for 12"x12"
Tempting Turquoise - #102067 for 8.5"x11" or #107103 for 12"x12"

Tools:Lattice Die - #115958
Big Shot - #113439

Embellishments:Rhinestone Brads - #113144
In addition to the supplies above, the quote on the top card was stamped using Old Olive Ink (#102277) with a stamp from the "Of the Earth" stamp set (#115336). This is hostess set available from now until the end of June...yours free with a $150 party!!! Also, I found our Paper Snips (#103579) useful for handcutting the Tempting Turquoise border around my flower on the second card and Stampin' Dimensionals (#104430) to help it pop!

Sunday, April 25, 2010

Sympathy Card - Very Versatile


A friend of mine from small group at church had a death in her family so I created this sympathy card for her & her husband. I knew that I wanted something a bit trendier so I immediately went for the kraft colored, retro circle & stripe patterned patterned paper from our Holiday Lounge paper pack. From there, I stamped the floral image from the (retired) Very Versatile stamp set that was featured in last summer's mini catalog in Chocolate Chip Classic Ink and Whisper White Craft Ink. I embossed the Whisper White ink using our white embossing powder. Once it was cooled, I brayered over it with Bermuda Bay and then wiped any excess ink off the embossed part. I love how the card turned out...I was thinking it might have been just as lovely to use a heathery blue, such as Bordering Blue, in place of the turquoise. Happy stamping my friends!

Please click HERE to order 24/7!!! Supplies used on this card:

Ink:
Whisper White Craft Ink - #101731
Chocolate Chip Classic Ink - #100908
Bermuda Bay Classic Ink -#115655

Cardstock:
Whisper White - #100730 (for 8.5"x11") or #106529 (for 12"x12")
Chocolate Chip - #102128 (for 8.5"x11") or #107102 (for 12"x12")

Paper: Holiday Lounge Designer Series Paper - #115675

Tools:
Heat Tool - #10005
Brayer - #102395

Other:
White Embossing Powder - #109132

Saturday, April 24, 2010

Earth Day Challenge


My demonstrators group weekly challenge was to create something inspired by Earth Day. I don't know about you, but in my neck of the woods the red bud and dogwood trees are just gorgeous in full bloom, so that is my inspiration for my Earth Day card. I'm always looking for an excuse to use this stamp set. It's called "Season of Friendship" and comes with everything you need to decorate the tree for any season, plus a nice quote about friendship. You've probably noticed a trend with me: that I love layers and dimensions, so the front "hill" of grass and the flowers are adhered with our foam adhesive, called "Stampin' Dimensionals". The clouds were created by sponging bashful blue onto whisper white cardstock, using a scallop circle punch to mask off areas of white. The card was still missing something, so I tied it off with a piece of satin ribbon. Happy (belated) Earth Day!

Please click HERE to order 24/7!!! Supplies used on this card:

Ink:
Bashful Blue (sky) - #105209
Certainly Celery (leaves) - #105217
Chocolate Chip (tree) - #100908
Old Olive (leaves) - #102277
So Saffron (flowers) -#105213
Brilliant Blue (bird) -#100691

Cardstock:
Whisper White - #100730 for 8.5"x11" or #106529 for 12"x12"
Chocolate Chip - #102128 for 8.5"x11" or #107102 for 12"x12"

Stamps: Season of Friendship - #111776

Tools:
Scallop Circle Punch - #109043
Paper Snips -#103579
Stamp-a-ma-jig (for easy placement of leaves & bird on tree) - #101049
Sponge - #101610
Crop-a-dile (to punch holes for ribbon) - #108362

Others: 5/8" Certainly Celery satin ribbon - #117288

Thursday, April 22, 2010

LAST CHANCE - Chocolate Bunny Stamp!


I promised another card using the Chocolate Bunny single stamp available in the current mini catalog and so here it is!


This one involved more paper crafting than stamping but was oh-so-fun to make! To create the Easter basket, I die cut the Top Note die twice on More Mustard Cardstock. Then I swiped Chocolate Chip ink across the die cuts to create a wood grain effect, and cut the die cuts into strips and wove them together. The basket was then created by cutting the die cut in half the short way. I decorated it with eggs (small oval punched through random scraps of patterned paper), Easter grass (used paper snips to cut fringes on a strip of Old Olive cardstock), scallop trim border punch and a butterfly from the Beautiful Wings Embosslit. I created the cloudy background, perfect for a springy day, by sponging Bashful Blue around a scallop circle punch. I stamped the Chocolate Bunny on Close to Cocoa cardstock with Chocolate Chip ink and then cut him out with my paper snips. To give the card some lift, and I adhered the bunny and some of the eggs with Stampin' Dimensionals. To give it some sturdiness, I adhered the whole basket down with Sticky Strip.

Happy Crafting!
Please click HERE to order 24/7!!! Supplies used on this card:
Ink:
Chocolate Chip Classic - #100908
Bashful Blue Classic - #105209
Cardstock:
Whisper White - #100730 for 8.5"x11" or #106529 for 12"x12"
More Mustard - #100946 for 8.5"x11" or #106542 for 12"x12"
Chocolate Chip - #102128 for 8.5"x11" or #107102 for 12"x12"
Old Olive - #100702 for 8.5"x11" or #106544 for 12"x12"
Patterned Paper:
miscellaneous scraps from retired Designer Series Papers and also from Sweet Pea, available in the current mini catalog - #117161
Adhesive:
Stampin' Dimensionals - #104430
Sticky Strip - #104294
Tools:
Paper Snips - #103579
Top Note Die - #113463
Big Shot - #113439
Scallop Circle Punch - #109043
Beautiful Wings Die - #118138
Small Oval Puch - #107304
Scallop Trim Punch - retired, but we have other beautiful border punches that would work just as well. Check out the Scallop Edge #112091 or the Eyelet Border #113692.

Wednesday, April 21, 2010

Last Chance! Chocolate Bunny Stamp


My how time flies when you love the mini catalog products! The end of April is just around the corner which means the end of our spring mini catalog. Therefore, I will be trying to showcase some of my personal favorites from that catalog until the end of the month, so check back often. And be sure to order something if you LOVE it, because the 30th will be here before you know it!

The first one is the Chocolate Bunny stamp. This single stamp is easy to use and also easy on the checkbook! This was a card we made in my demonstrators group and I love how it turned out. Pretty in Pink and Chocolate Chip make a wonderful color palette, but I also think Chocolate Chip looks wonderful with Certainly Celery or Bashful Blue. This card also uses the patterned paper from our Shades of Spring line which will also be retiring April 30th.

It's never to soon to think about cards for next year, especially since this stamp set won't be around then! Come back tomorrow for another example using this stamp.


Please click HERE to order 24/7!!! Supplies used on this card:

Paper: Shades for Spring Designer Series Paper - #117160
Cardstock:
Very Vanilla (#101650 for 8.5"x11"' or #106530 for 12"x12")
So Saffron (#105118 for 8.5"x11" or #107088 for 12"x12")
Close to Cocoa (#101341 for 8.5"x11" or #107101 for 12"x12")
Chocolate Chip (#102128 for 8.5"x11" or #107102 for 12"x12")
Stamps:
Chocolate Bunny stamp - #116980
Teeny Tiny Wishes stamp set - #115370
Tools:
Paper Snips (for cutting out the bunny) - #103579
Small Oval Punch - #107304
Large Oval Punch - #107305
Scallop Trip border punch (retired - but any border punch would do & we have some great ones to choose from)
Ink: Chocolate Chip Classic - #100908
Other: Flat-backed pearl from Pretties Kit - #109114
Adhesives:
Snail Adhesive - #104332 (refills #104331)
Sticky Strip (to adhere pearl) - #104294


Monday, April 19, 2010

Designer Series Paper Challenge


My demonstrators group decided this week's challenge should be use any of Stampin' Up!'s yummy designer series paper. I chose Razzleberry Lemonade, which features three of our current In Colors (rich razzleberry, crushed curry, and melon mambo). Here is the card I made...it would be so easy for you to adapt to your own patterned papers and even better...in the spirit of Earth Day this week, it would easy to use up your scraps with this layout and get a different look everytime! Happy Stamping!
Please click HERE to order 24/7!!! Supplies used on this card:

Paper: Razzleberry Lemonade (#115675)

Cardstock:
Melon Mambo textured cardstock {available in combo packs of 8.5"x11" (#115719) or 12"x12" (#115538)}
Rich Razzleberry cardstock (#115316 for 8.5"x11")

Stamps: Kind and Caring Thoughts - this is a hostess set, yours free for hosting a party of $300 or more...it's easy, ask me how! But hurry, this set is only available till the end of June.

Ink: Rich Razzleberry classic (#115658)

Other: 1/4" white grosgrain ribbon (#109025)

Saturday, April 17, 2010

Exciting New About Color Renovation

Did you hear the news? Stampin' Up! has decided to do some renovations to their color families. Based on demonstrator and customer feedback, as well as research into the latest trends, we will be unveiling a new color collection in the new catalog, to be released to customers on July 1st. If you're like me, you're excited to try new things...here's a sneak peek at what the new families will be:

download: Color Renovation: New Color Collections flyer

You might be wondering, well, what does that mean to me? First, you will have some fresh, on trend colors to start playing with this summer. You may have noticed that some of the colors are familiar...that is because we are carrying over many of the favorites from our old color families. In addition, we are bringing back 10 of our past In Colors. To round out these color families and freshen them up, Stampin' Up has developed 5 new colors as well. As a demonstrator, one of the perks is that I got to see the new colors first hand and you are going to LOVE them! They are so rich and will be very versatile. Definitely a good addition to the Stampin' Up color lineup.

It also means that we are going to have to say a fond farewell to some of the other colors that have found their way into our stamping palettes over the past years. Undoubtedly, some of these have become favorites for you, so now is the time to stock up on any cardstock, designer series paper, ink pads, ink refills, markers, etc. Any orders placed in April and May will definitely be filled; orders placed in June will be filled only if the product is still available, so if any of your favorites are on this list, stock up now! I know I will be replenishing my stock of Ruby Red and Tempting Turquoise.
And, as if that weren't enough...we will be getting five new In Colors this summer, and they will last for two years, instead of one like in the past. And then next summer, we'll get five more In Colors, which will last for two years, so we will have 10 In Colors at one time, starting next summer. This is going to be such a fun way to keep our collections fresh and on trend. Watch for a sneak peek of the first five In Colors in June.
You might be asking how do I get my hands on these new colors? They will be available for purchase starting July 1st. You will have the option, just like in the past to purchase individual ink pads, markers, ink pad refills, cardstock, etc. in any color we offer. Additionally, for those of you who "just gotta have it all"...we will be offering "new color" kits for Stampin' Write Markers, Stampin' Pastels and Watercolor Wonder Crayons. This way you can add-to your already existing collection by only adding the new colors or get a great start on a collection with the latest colors.
Another thing to be on the lookout for: an awesome NEW Color Coach tool that you won't want to be without! This is designed to not only show you all of our awesome colors, but also to help you plan your cards, scrapbook pages, and altered items.

Stampin' Up! has thought of everything! So keep your eyes peeled for more information as we get closer to the date!

Thursday, April 15, 2010

Vintage Vogue Congratulations Card


I created this card for my boss's anniversary with the company, but it could easily be adapted to fit other occasions (feminine birthdays, Mother's Day, thank you, thinking of you....) with a different greeting. It's actually a lot easier than it looks! So start, I stamped the foliage/filigree stamp from the Vintage Vogue set in Old Olive on two opposite corners of whisper white cardstock. Next, I punched out ten Chocolate Chip tags using the Medium Jewelry Punch. I adhered the first row of tags so that the bottom of the tag lined up with the bottom of the white panel. Then I lined up the second row of tags on top of the first, covering up the round top part of the bottom tags. Next I cut a strip of cardstock the same width as the tags, and laid that across as my horizontal part of the fence. Now for the fun of embellishing! I stamped the small flowers from the Vintage Vogue set onto Whisper White cardstock with Dusty Durango and So Saffron ink and then cut them out using our small snips. I adhered those to the stamped white panel, making sure to adhere a few with Stampin' Dimensionals to give them a little lift. I embellished them with pearls from my stash. I also used the Embosslits Beautiful Wings die to cut out a butterfly to adhere to the fence. I finished it up with a piece of Old Olive grosgrain ribbon and stamped greeting (I used the Well Scripted set).

Cardstock:
Whisper White (#100730 for 8.5"x11"' or #106529 for 12"x12")
So Saffron (#105118 for 8.5"x11" or #107088 for 12"x12")
Old Olive (#100702 for 8.5"x11"or #106544 for 12"x12")
Dusty Durango (#115321 for 8.5"x11")
Chocolate Chip (#102128 for 8.5"x11" or #107102 for 12"x12")
Adhesives:
Stampin' Dimensionals (double-sided foam dots) - #104430
Snail Adhesive - #104332 (refills #104331)
Sticky Strip (for adhering ribbon) - #104294

Tools:Paper Snips - #103579
Beautiful Wings Embosslits - #118138
Big Shot Machine - #113439
Medium Jewelry Punch - #117190

Ink:
Old Olive Classic - #102277
Dusty Durango Classic - #115654
So Saffron Classic - #105213

Stamp Sets:Vintage Vogue (hurry! this set is only available till April 30th) - #117690 for wood mounted; #118598 for cling mounted
Well Scripted (hurry! this set is only available till April 30th) - #117072 for wood mounted; #118601 for cling mounted
Other:
1/4" grosgrain ribbon in Old Olive - #109031
adhesive pearls from my stash

Tuesday, April 13, 2010

Inspiration Challenge


My upline challenged our group of blogging demonstrators to use this photograph as inspiration for our stamping this past week. I was drawn immediately to the color scheme - so springlike and fresh! I also liked the texture of the quilt, the femininity of the flower wall-hanging and polka-dot pattern on the bedspread. The card above is what I came up with.

To get texture on this card, I ran a small piece of whisper white cardstock through the Big Shot in our exclusive polka dot textured impressions embossing folder. Then I left the paper in the folder, opened the folder up, and brayered So Saffron ink onto the back side of the embossed paper. By leaving it in the folder, it prevents the brayer from pushing the dots back in. Then I stamped the flower in Rose Red craft ink, sprinkled it with the embossing powder and heat set it. Next I put the strip of Pumpkin Pie cardstock down and stamped by sentiment on it. Then I wrapped my ribbon around it all and mounted it on the Tempting Turquoise base.


Please click HERE to order 24/7!!! Supplies used on this card:

Cardstock:
Whisper White (#100730 for 8.5"x11"' or #106529 for 12"x12")
Pumpkin Pie (#105117 for 8.5"x11" or #107100 for 12"x12")
Tempting Turquoise (#102067 for 8.5"x11" or #107103 for 12"x12")
Stamps:
Of the Earth Hostess set - #115336 (that's right, you can earn this set free by hostessing a workshop totalling $150 or more!)
Teeny Tiny Wishes stamp set - #115370
Tools:
Brayer - #102395
Big Shot - #113439
Embossing Folder
Heat Tool - #100005
Powder Pals - #102197
Stamp-a-ma-jig - #101049

Inks:
So Saffron classic (polka dotted paper) - #105213
Rose Red craft (flower) - #101545
Old Olive classic (sentiment) - #102277
Other:
5/8" Old Olive satin ribbon - #117292
Clear Embossing Powder - #109130

Adhesives:
Snail Adhesive - #104332 (refills #104331)
Sticky Strip (I find this works really well on ribbon) - #104294


Friday, April 2, 2010

Stampin' Up Clearance Sale! Check it out...you won't want to miss this...


You better hurry before they're gone! There are some fabulous Clearance Item Deals going on in my STAMPIN' UP! ONLINE STORE! Get up to 60% off on amazing Stampin' Up! products - only while supplies last! (and only available online!) SHOP NOW
I have to say, some of my favorite things are the Designer Series Papers. So many great color options that would be great for spring- or summer-themed cards, scrapbook pages, invitations, and altered projects. Pictured below are "Georgia Peach" and "Haiku"...both are oh-so-yummy! Thank you for supporting my Stampin' Up! business! - Michelle Hamilton

Wednesday, March 17, 2010

About Stampin' Up!'s New Cling Mount Stamps


Over the past few years, there has been enormous demand from our customers for a line of repositionable clear-mount rubber stamps.
Well, you asked for it, and now you have it! Starting with stamps in the 2010 Occasions Mini Catalog and the 2010 Sale-A-Bration Brochure, Stampin' Up! now offers our exclusive stamp art in both traditional wood-mount, and the new clear-mount option.
Our new clear-mount rubber stamps are the result of extensive research with the intent to maintain the very best image quality in the stamping industry, while at the same time offering the ease-of-use and storability inherent in repositionable clear-mount rubber stamps.

Clear-Mount Rubber Stamp Features:

  • Nine different sizes of clear blocks available individually or as a discounted bundle.

  • Blocks have ergonomic grooves on all four sides for easy grip and traditional wood-mount feel.

  • Stamps and blocks are durable and easy to clean with your Stampin' Scrub and Stampin' Mist.

  • Optional image labels on stamp backs let you decide if you want to see the image through the block or not.

  • Tight die-cutting for easy image positioning.

  • Large clear blocks can be used to create collages or spell words with alphabet sets.
    Stamps store easily in standard, DVD-type cases with artwork on front and spine, making organization easy.

Our blocks are available in the following sizes:
118487 Block A (1-3/16" x 1-1/4") $3.95
117147 Block B (1-5/8" x 1-15/16") $5.95
118486 Block C (2" x 2-1/4") $6.95
118485 Block D (2-7/8" x 2-11/16") $8.50
118484 Block E (3-7/16" x 4-7/16") $11.95
118483 Block F (4-7/8" x 6") $16.95
118489 Block G (3/4" x 2-1/2") $4.50
118490 Block H (1-5/8" x 4-7/16") $8.50
118488 Block I (2-1/4" x 5-7/8") $11.95
118491 Block Bundle (Blocks A-I) $69.95

Monday, March 15, 2010

Eager for Easter - Chocolate Bunny


One of the things that I love about being a demonstrator is being involved in swaps with the other demonstrators in my upline’s group. These swaps are a great way to learn new techniques, see more products firsthand, and it always gets my creative juices flowing again. Of course, it usually serves to enable me…more than once, I’ve ordered a product simply because what they had done with it was so cute.

One swap card I received recently was from my fellow demonstrator, Gayle Klingelhoets, did just that. She sent me this scrumptious chocolate bunny card. I had previously overlooked that simple stamp but fell in love when I saw her yummy green and chocolate brown version. And, at $7.95, the price is just right!

So I promptly ordered that stamp and came up with the card you see at the top of this post. By stamping it in chocolate chip ink on close to cocoa cardstock, I really accentuated the texture on the bunny – just like a real chocolate bunny. Then I carefully cut it out using paper snips and then adhered it with Stampin’ Dimensional to add some depth to the card.

Please click HERE to order 24/7!!! Supplies used on this card:
Paper:
Shades for Spring Designer Series Paper - #117160
Sweet Pea Designer Series Paper - #117161

Cardstock:
Whisper White (#100730 for 8.5"x11"' or #106529 for 12"x12")
So Saffron (#105118 for 8.5"x11" or #107088 for 12"x12")
Close to Cocoa (#101341 for 8.5"x11" or #107101 for 12"x12")

Stamps:Chocolate Bunny stamp - #11690
Teeny Tiny Wishes stamp set - #115370

Tools: Paper Snips (for cutting out the bunny) - #103579
Inks: Chocolate Chip Classic - #100908

Other: 5/8" Pretty in Pink satin ribbon - #117289
Adhesives: Stampin' Dimensionals (double-sided foam dots) - #104430
Snail Adhesive - #104332 (refills #104331)
Sticky Strip I find this works really well on ribbon - #104294

Sunday, March 14, 2010

Simple St. Patty's Greeting


This week’s challenge in my stamping group was to create something using the cute little Love Notes, available for a limited time in our Occasions mini catalog. The love notes are little die cut sheets of cardstock that fit into sheer glassine envelopes. I think either size would be great for gift tags, the large size would be a cute book mark, and they both make great additions to cards and scrapbook pages. I even thought they would be cute decorated and then slipped into the lunch bags of those you love.

This card was really simple to create…I used the shorter, wider hearts from the heart-to heart punch and clustered them together on the love note to form my shamrock. I used my large circle punch to punch out a circle and then circle punched a sliver off that circle to create the stem. For added depth, I put the love note on some Stampin’ Dimensionals, and adhere that to the textured green background…the texture, by the way, comes from our new Perfect Polka Dots Textured Impressions embossing folder, which is so versatile and adds lovely texture to any project. I felt like the shamrock was missing something, so I added a little gemstone from my stash, but I think a brad, button or other cute little embellishment would also do the trick.

All in all, it’s a simple card to create and still packs a “punch” (pun intended)!

Please click HERE to order 24/7!!! Supplies used on this card:

Cardstock:
Whisper White (#100730 for 8.5"x11"' or #106529 for 12"x12")
Garden Green (#102584 for 8.5"x11"or #107096 for 12"x12")

Adhesives:
Stampin' Dimensionals (double-sided foam dots) - #104430
Snail Adhesive - #104332 (refills #104331)

Tools:
Big Shot Machine - #113439
Perfect Polka Dots Textured Impressions embossing folder - #117335

Other:
Love Notes Kisses - #118779
rhinestone from my stash

Friday, March 12, 2010

Eager for Easter - A Good Egg


For a long time, A Good Egg was my only set of Easter stamps, and I loved the versatility that it afforded me. It’s easy to create a variety of Easter eggs, cute little chicks or a combo of both. The polka dots, circles and flowers also work really well as background stamps on any paper crafting project – not just the Easter ones. While this card wasn’t hard to create, it was a bit more time consuming due to the hand cutting. However, our paper snips do a terrific job of making even that task easier.

To start, I stamped the chick on the patterned green paper (which served as my background), the patterned purple paper (which became my eggshell), on a small scrap of orange patterned paper (for the beak) and a scrap of so saffron cardstock. From there, I started cutting things out…I cut the beak out of the orange, the chick out of the yellow and eggshell out of the purple polka-dot. And then I adhered it all together, using the green stamped image as my foundation. By pre-stamping the green, the chick still has a few little wispy “hairs” on his head and his feet, and I didn’t have to try and cut around them! From there it was just a matter of layering cardstock and patterned papers, and then adhering the ribbon and button. Isn’t that button perfect, by the way? I love that flower on it and the combination of sheerness and opaqueness all in one button!
Please click HERE to order 24/7!!! Supplies used on this card:
Cardstock:
Whisper White (#100730 for 8.5"x11"' or #106529 for 12"x12")
So Saffron (#105118 for 8.5"x11" or #107088 for 12"x12")
Adhesives:
Stampin' Dimensionals (double-sided foam dots) - #104430
Snail Adhesive - #104332 (refills #104331)
Sticky Strip - #104294 (used to adhere the ribbon)

Tools: Paper Snips - #103579

Ink: Chocolate Chip Classic (Happy Easter) - #100908

Patterned Paper: Shades of Spring Designer Series Paper - #117160

Stamp Sets: A Good Egg - #114974
Other: Button from our button latte designer button pack (#114333), 1/2" striped grosgrain ribbon in so saffron (#113882)


Eager for Easter - Lattice Die


Have I mentioned how much I love tulips? I didn’t get enough of my tulip-making fun the other day, so I got out my XL Two-Step Bird Punch and my Lattice Die and started playing again. I’m pretty pleased with the results, though now I’m curious to see what it would look like in other colors.

The so saffron die cut “medallion” was made by cutting out two lattices from our exclusive Lattice Die. Then I adhered them together, with the top lattice rotated 45 degrees from the bottom lattice, and then I cut off the “tips”. The center of the medallion is a one of the cool Vintage Labels from this year’s Sale-a-bration catalog, stamped in old olive, and then punched out with our scallop punch. That is one thing that really sold that Vintage Label set to me is how they coordinate so well with our punches to make great card decorations, scrapbook page embellishments and even cool gift tags and labels. Then I created the tulip using the bird’s wing and stem cut from punches made with the XL Two-Step Bird punch, adding Stampin’ Dimensionals to give the card some lift. I also punched, then trimmed, multiple branches with that bird punch to create the leafy wreath around that scallop punch. The final touch is the simple Easter greeting taken from Teeny Tiny Wishes.

Please click HERE to order 24/7!!! Supplies used on this card:


Cardstock:
Whisper White (#100730 for 8.5"x11"' or #106529 for 12"x12")

So Saffron (#105118 for 8.5"x11" or #107088 for 12"x12")

Old Olive (#100702 for 8.5"x11"or #106544 for 12"x12")

Kraft (#102125 for 8.5"x11" or #107070 for 12"x12")

Adhesives:

Stampin' Dimensionals (double-sided foam dots) - #104430

Snail Adhesive - #104332 (refills #104331)

Tools:

Scallop Circle Punch - #109043

Lattice Die - # 115958

Big Shot Machine - #113439

XL Two-Step Bird Punch - #117191

Ink:

Chocolate Chip Classic (Happy Easter) - #100908

Old Olive Classic - #102277

Patterned Paper:

Sweet Pea designer series paper (scraps used to punch tulip petals)- #117161

Welcome Neighbor designer series paper (rose red background) - #118401 - this paper is available only through the Sale-a-bration promotion...the good news is it can be yours, FREE, with any $50 purchase.

Stamp Sets:

Teeny Tiny Wishes - #115370
Sale-a-bration set: Vintage Labels - #119122 for the wood mount set, #118392 for the cling mount set -you can earn this set free with any $50 purchase.

Thursday, March 11, 2010

Speaking of Punches!!! About Stampin Up's New Punch Design

Starting with the new 2010 Occasions Mini Catalog and continuing with all new punch designs going forward, Stampin' Up! has adopted a new body style for our punches! A few features of the new punch style:
  • Low-profile, rectangular punch body allows for easier stacking and storing

  • Punches lock shut for easier storage and transport

  • Dual labels on top and end allow for easy identification and selection when stored

  • New punches allow for larger punched images and more intricate designs while providing greater ease of use.

  • Corner punches allow you to punch a corner design along the inside edges of a page, not just corners

  • Our new larger, whole-hand handle design provides better leverage for easier use

Part of Stampin' Up!'s commitment to providing customers with the very best crafting tools includes the belief in what we call continuous improvement. Essentially what this means is that even if something works very well, but we see a chance to improve it, we will work to make it even better. While new punch designs will be in the new body style, existing designs will remain in the existing body style for now. We will communicate any further changes as those decisions are made.

Sunday, March 7, 2010

Peace Dove


There's nothing like Christmas in....March? Yeah, well, I was on a roll with Stampin' Up's awesome XL Two-Step Bird Punch and couldn't resist fast-forwarding nine months to the most wonderful time of the year.

This punch immediately reminded me of a dove and olive branch...the symbol of peace and so I thought it would make a beautiful Christmas card. And the punch would make this an easy card to mass produce....the only catch is that the punch is only available until April, 30th so if you want to use this idea, you'll have to grab it now!

The textured background was made with the Petals-a-Plenty embossing folder from last fall's Occasions catalog. If you missed it last fall/winter, you're in luck! It's one of the items they've made available again, while supplies last.

Please click HERE to order 24/7!!!
Supplies used on this card:


Cardstock:
Whisper White (#100730 for 8.5"x11"' or #106529 for 12"x12")
Old Olive (#100702 for 8.5"x11"or #106544 for 12"x12")
Real Red (#102482 for 8.5"x11" or #106545 for 12"x12")

Adhesives:
Stampin' Dimensionals (double-sided foam dots) - #104430
Snail Adhesive - #104332 (refills #104331)
Sticky Strip I find this works really well on highly textured papers - #104294

Tools:
XL Two-Step Bird Punch - #117191
Big Shot Machine - #113439
Petals-a-Plenty embossing folder - #116824

Stamps:
Four the Holidays (retired)

Ink:
Basic Black Classic Ink pad - #101179
Basic Black Stampin' Write - #100082

Saturday, March 6, 2010

Bird Punch - Tulips


I had a fun time making this card...tulips are one of my favorite flowers: they are elegant and happy and such a welcome promise of what's to come each spring! So I couldn't resist making this card.

Two special things I'd like to point out here...the first is that the tulips are made from the bird's wing from the XL Two-Step bird punch that is available until April 30th. The purchase of the punch would put you on your way to earning a free stamp set with every $50 you purchase!

I just punched three wings for each tulip and then pieced them together in threes. The top-most petal of each is adhered with a Stampin' Dimensional to give it some lift. I also used the branch from that punch to create the greenery in the bouquet and just cut the stems and leaves so that they laid the way I wanted them to.

The other thing I wanted to point out was that I created the background (the spotted, so saffron paper behind the tulips) using the leaves stamp from the Branch Out set. Unfortunately, that stamp set is retired, however, you can create a similar effect with markers, sponges, or I CHALLENGE YOU to look through your own stash and find a way to use one of your stamps as a background. After all, the more mileage we can get out of our supplies, the better right? And the easier it becomes to justify our addiction, I mean, hobby, right? ;)

Happy Stamping!!!

Please click HERE to order 24/7!!!
Supplies used on this card:

Cardstock:
Whisper White (#100730 for 8.5"x11"' or #106529 for 12"x12")
So Saffron (#105118 for 8.5"x11" or #107088 for 12"x12")
Old Olive (#100702 for 8.5"x11"; #106544 for 12"x12")

Adhesives:
Stampin' Dimensionals (double-sided foam dots) - #104430
Snail Adhesive - #104332 (refills #104331)

Tools:
XL Two Step Bird Punch - #117191 (from the Occasions mini catalog only availabe until April 30th)

Patterned Paper: Sweet Pea designer series paper (#117161)

Stamps:
Whimsical Words - Sale-a-bration set (earn it free with any $50 purchase) - available in wood mount (#118386) or cling mount (#119119)

Branch Out (retired) - used it to make the spotted so saffron background for the tulips

Ink:
Old Olive classic (#102277)
So Saffron classic (#105213)

Other: 5/8" satin ribbon in pretty in pink (#117289)
Pin It button on image hover