Monday, September 14, 2015

Butterfly Basics


I'm so excited!  I just made my first sale on my Etsy shop.  As a thank you to this customer, I made a card to include along with the item she ordered.  I used Whisper White, Crushed Curry, and Always Artichoke for my color palette.  I chose to add a bit of bling to the butterfly using adhesive rhinestones, and added some extra interest by heat embossing the image in black, using the border & background stamps from the Butterfly Basics stamp set, and using a tool to spritz some ink to create a grungy look.

I got my inspiration from a card I saw on Mary Fish's website.  I changed a few things but I still think both are lovely.  I hope my new customer enjoys it...I left it blank & included a blank envelope so that she could send it to someone else.


To buy the supplies to make this card, please click on the product images below.


Built for Free Using: My Stampin Blog


Sunday, September 13, 2015

Timeless Elegance Birthday Card


My husband and I decided to take today off from all responsibility - we mowed yesterday, cleaned and grocery shopped the day before and so today he is watching movies & I'm playing with paper.  I decided to go online and look up some card challenges to use as my point of inspiration and was excited to find the sketch challenge at Always Playing with Paper and decided to give their sketch a whirl.  I'm really pleased with how it turn out.  Such a simple card, really...but lots of "wow"!


If you'd like to buy this card, you can do so in my Etsy shop.

If you'd like to buy the supplies to make this card, you can do so by clicking on the product images below.


Built for Free Using: My Stampin Blog

Thursday, September 10, 2015

Stars Challenge 9/10/15


This week's team challenge was to create a card using the following sketch.  Isn't it versatile?  I chose to rotate the card 90-degrees, but you could also replace the strips underneath the square with banners or ribbon or you could use patterned paper instead of the solid cardstock I chose.  And that square, well, it could be a circle, or any of the Thinlits shapes...the sky is the limit.  As for me, I have had one of this year's new Christmas paper packs, Merry Moments, laying around and decided it was time to start using it to plan upcoming classes & to start preparing for Christmas.  I drew color inspiration from the patterned paper, using Mossy Meadow, Real Red, and Old Olive for my colors.  Also, I added a bit of bling to the Tree using our Rhinestones.  When you buy a pack of our rhinestones, they come with many individual rhinestones of varying sizes and then several strips of the smallest rhinestones, which made it super easy to just line up over one of the plaid lines on the tree.  I just trimmed them to the right length with my X-acto knife and then used the point of the knife to transfer the strip of rhinestones from the packaging to the paper.  I experimented with placing the cut-out tree on plain red cardstock, but it needed something, so I ran the cardstock through my Big Shot in the On Point Textured Impressions Embossing Folder.  The tree & inside sentiment are stamps from the Lots of Joy stamp set.  I've got several more designs up my sleeves using these papers & stamps so check back often!

DSC#148


If you'd like to buy this card, bop on over to my Etsy store by clicking HERE and I'd be happy to help you out! 

If you'd like to see how my friends interpreted this sketch, click on their names below:
Connie Plaumann
Sharon Bennett
Robyn Rasset
Judy Strickling
Ashley Simmons
Miriam Bollinger
Dawn Olchefske


Wednesday, September 9, 2015

June My Paper Pumpkin


Recently, I posted a few cards I made with my June "My Paper Pumpkin" kit, which you can see HERE.  As I mentioned, I only had time to make half the kit that day.  Since then, I was able to make the rest, so now I'm sharing with you the other half.

The muted greens, blues and taupe made me think of traditional baby boy and I have a few friends who are expecting, so I decided to make a few of them into baby cards, but it also never hurts to have birthday cards laying around.  Thus, I used the "it's your day" sentiment that came with the kit on the outside of two of the cards & then used a "happy birthday" stamp from my stash on the inside of those two cards. For the other two cards (the baby cards) I used two stamps from the Petite Pairs stamp set ("welcome baby" and "glad you're here").  If you haven't seen that set yet, go check it out...it's very versatile and unique in our lineup because it allows you to have stamped sentiment on both the inside and outside of the card.

They still haven't made this kit available for purchase, but my hope is that they will so keep an eye on my blog or store for details.

Happy stamping!

Monday, September 7, 2015

Gently Falling - Thank You


The other day, I participated in a challenge to use only Mossy Meadow and neutrals.  I completed that challenge but while I had the materials out, I decided to make another card.  This one just kind of fell together.  I had the chevron background already cut out, leftover from the day I made these cards. And the rest of just kind of happened from there.  The stamps used here are both retired, unfortunately, but you may be able to find them on Etsy or Ebay.  They are Gently Falling (leaf) and So Very Grateful (sentiment).  The Ink is Mossy Meadow.  The cardstock is Very Vanilla and Mossy Meadow.  And though you can't tell it from here, I did pop the sentiment with some dimensionals (foam adhesive).

Here are some other cards I've made using this set:
Monochromatic Thank You Note
Fall-Themed Thinking of You card
Sympathy Card

Saturday, September 5, 2015

CMCC#87 - Colour Me... Monochromatic!


I was eager to do this week's challenge because...well, it was going to be a challenge for me.  You see, I love color...lots of it...and I also tend to not use green.  So it was a bit harder for me to come up with something that I'm satisfied with, but I liked that.  Mossy Meadow really is a pretty shade of green.  It's almost, I don't know...suedy?  Anyway, this is what I came up with.  A pretty card with leaves from the retired "Gently Falling" stamp set & sentiments from the retired "So Very Grateful" set as well as a retired wooden button.  I also used some leftover twine from June's My Paper Pumpkin kit, some Very Vanilla Cardstock as my neutral, and the current In Color Ribbon.  I even took the time to decorate the inside a bit, which I love, but don't always make the time do.  I hope you enjoy my take on the color combo Mossy Meadow + Neutral.  Happy stamping!


And here is the inspiration palette:


Check out their blog and see how other artisan's interpreted this color scheme HERE.

Friday, September 4, 2015

Sprinkles of Life - Bird on a Branch


I almost titled this blog post "Tree Bird" kind of like "Free Bird" but then I refrained from my musical nerdery.  So, anyway, this card is the result of a series of happy accidents.  I set out to copy a similar card I found on this blog.  But, when I went to cut out the circle, I realized I didn't have the right-sized circle punch (all mine were too small), so I decided to use my Circle Collection Framelits.  When I did it, I cut it on what I thought would be the upper right quadrant.  However, when it came out, one side of the paper had some scratches on it from my older cutting mat, so I flipped it over to get the smooth side.  But when I did, it put the circle at the bottom right instead. The upside of this was that it had embossed a circle border around the hole, which was pretty cool, I thought...a nice extra detail that I hadn't planned!

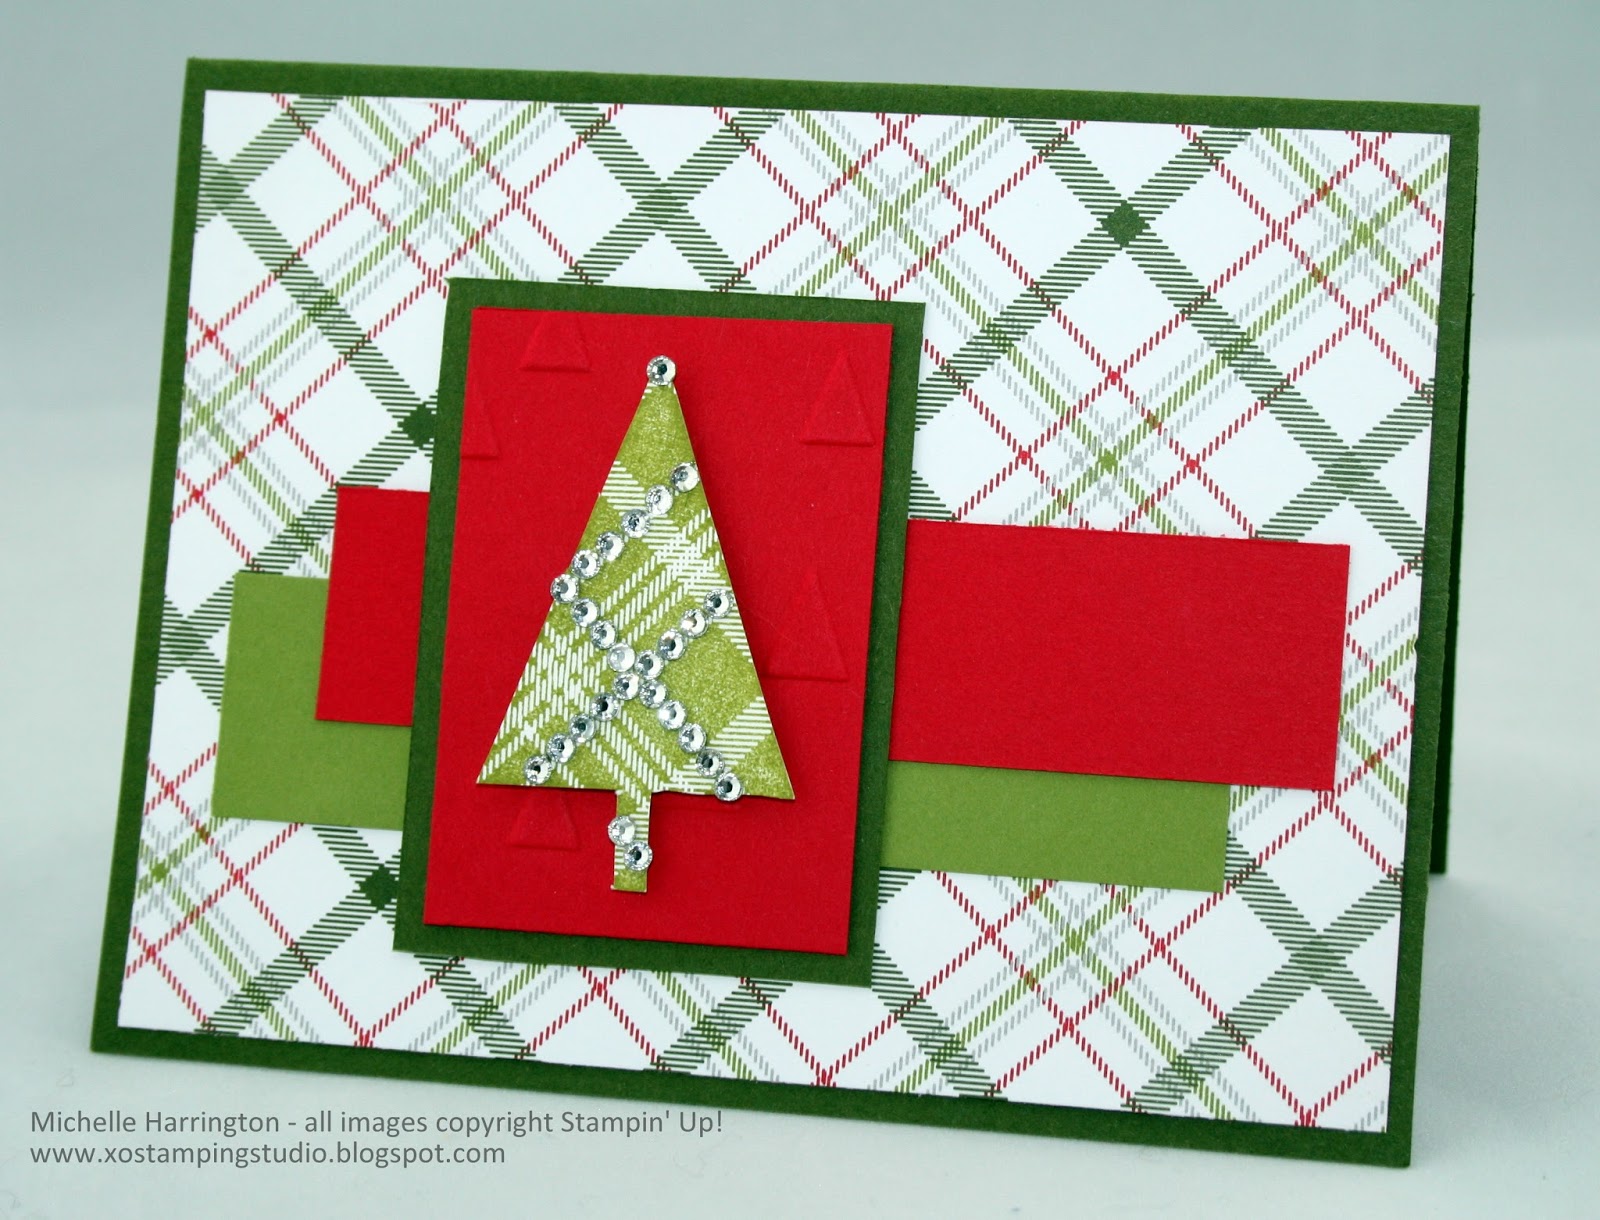
To create some interest, I added small strip of patterned paper from the Cherry on Top stack to the left-hand side.  Then to cover the seam between the cardstock and patterned paper, I adhered some of our 1/4" Cotton Ribbon to the card, and made sure the bow was in the upper left corner to balance out the stamped images on the lower right.  To create the tree-bird cluster, I used images from the Sprinkles of Life set.  First, I stamped the branch with Tip Top Taupe ink onto Tip Top Taupe cardstock and then punched it out using the Tree Builder punch.  Next, I stamped the bird in Watermelon Wonder ink on Watermelon Wonder cardstock, and again punching it out with the Tree Builder Punch.  Finally, I stamped the leaf cluster using Cucumber Crush ink on Cucumber Crush cardstock, then using my paper snips to cut out a small cluster of the leaves.  Then I stuck it all down, making sure to use a chunk of Dimensionals to make the bird pop.  On the inside, I stamped the "I'm so lucky to call you my friend" sentiment, also from the "Sprinkles of Life" stamp set....but really this is a versatile enough card you could use just about any sentiment.  You could also modify the colors to make it a more seasonal card - I think a little brown or black bird amid fall-colored leaves would be pretty, as well as a little red cardinal among a glittery white scene.

If you liked any of the products I used, I'd be honored if you chose to purchase from my store - just click on the product you want and it'll take you there!  Happy stamping!

Thursday, September 3, 2015

DOstamper STARS Challenge - Color My World DSC #147


When I saw this week's color palette, my mind immediately went to one of my favorite places on earth: Minnesota's North Shore.  If you've never been there, you really should go.  It's breathtakingly beautiful with the stunning blues of Lake Superior, miles of rocky, craggy shoreline, waterfalls, lighthouses, tall whispering pines & plenty of hiking.  So I decided to capture that feeling by using an image of nature (from retired stamp set Moon River) and rustic materials (leftover twine from the June My Paper Pumpkin kit and the Woodgrain Textured Impressions Embossing Folder).  


Be sure to check out my friends' logs by clicking on the links below to see their interpretations of this color scheme.  I think you'll be just as delighted as was!

Judy Strickling
Ashley Simmons
Sharon Bennett
Miriam Bollinger
Connie Plaumann
Dawn Olchefske
Robyn Rasset


Wednesday, September 2, 2015

STARS Challenge - Sketch Pad DSC #145


Awhile back, my upline and teammates completed a sketch challenge.  I wasn't able to do the sketch at that time, but I loved it so much, I filed it away for "someday".  Someday is today! :)  I interpreted it pretty literally this time, right down the flower accent!

I chose to use the Cherry on Top Designer Series Paper to keep it happy and playful.  The fun thing about this paper is that there are some specific themes (like cherries, cupcakes, and ice cream) which are fun, but limiting.  However, there are also plenty of other papers that don't really feel thematic that you can use for projects like this Thank You note.

I decided to use the posy stamp from June's My Paper Pumpkin to create the floral embellishment.  I think that flower stamp is just so cute, and also fit my lighthearted, happy theme.  Accented with a Bermuda Bay button and white baker's twine, it's an easy but oh-so-cute addition to this card.  While I chose to make it a thank you note, you eliminate the sentiment entirely, or you could use any number of other sentiments because this card is somewhat neutral.  I think this would also be a great layout to use for birthdays, Christmas, valentine's....well, you get the idea! 


DOstamperSTARS Thursday Challenge DSC#145

For more inspiration, check out the work my teammates did using this sketch:


  • Connie Plaumann: Halloween Treat card
  • Sharon Bennett: Garden in Bloom cards
  • Miriam Bollinger: Flowering Flourishes card
  • Robyn Rasset: Chalk it up to Love card
  • Judy Strickling: A Ray of Sunshine card
  • Ashley Simmons: Celebrate Today card
  • Dawn Olchefske: Acorny Thank You


  • As luck would have it, around the time I was working with the DoSTAMPers sketch, I noticed a similar sketch floating around the internet.  So for even more inspiration, go check out these interpretations!


    If you'd like to purchase this card, please visit my Etsy shop.

    Come back tomorrow to see the new Stars challenge...and until then, happy stamping!

    Sunday, August 30, 2015

    Sprinkles of Life - Birthday Tree


    Last month, I felt a class for some scrapping friends using the Sprinkles of Life stamp set.  As part of the class fee, they went home with the full stamp set to keep, so I wanted to make some samples of cards they could make they got home, and this is one that I chose to make.

    I *loved* playing with my new Triple Banner Punch and the beautiful little Blossom Accents to add some details to this card.  Even though the accent is a flower, I think this card is still neutral enough to be sent to a man or woman, and to be modified for different occasions (get well, so sorry, missing you...).  The yellow is a new color this year, it's called Delightful Dijon - pretty accurate name, don't you think?  It pairs nicely with the Always Artichoke and Tip Top Taupe, which are the other colors I used.

    I hope you enjoyed - thanks for stopping by today!

    Supplies used:
    Built for Free Using: My Stampin Blog


    Friday, August 28, 2015

    In Color Chevron Background


    Do you ever have an idea in mind, and when you actually try it...it works!?! :)  I love it when that happens. That's what happened with the backgrounds on these cards.  When I found this die online, I knew I wanted to try cutting it out of multiple colors and then piecing it back together.  So I was pleased when I tried it and it worked.

    What I didn't think through was how labor-intensive it would be.  You see, I had to run the die through the machine 8 times.  3 times to get 3 white borders, and 5 times (one for each color) to get the all the little pieces. Then I had to glue each piece back in place by hand, but found out that most of the holes are slightly different sizes from each other so you had to find the right piece to put back in the right slot. Needless to say, I'm pleased with the look, but will definitely be saving this technique for the occasions where I have more time. There were actually enough pieces leftover to make a few more, but I ran out of patience for now.

    If you're a Stampin' Up! fanatic like me, you might be thinking you don't recognize that chevron background die from our line-up.  And you'd be right!  I usually purchase Stampin' Up! products...after all, they are they are high quality, beautiful and I get a discount.  What's not to love, right?  But every once in a while, something comes along that I just have to have, and we don't offer anything comparable.  That's what happened with this Chevron Pattern Full Card Craft Die from Simon Says Stamp...I just had to have it.

    My process in designing these cards was simple.  First, I wanted a color combination that would work well for several cards because I knew I could be assembling up to five of them to use up all the pieces.  I decided on the 2014-2016 In Colors because they look beautiful together.  What surprised me, though, was how different each card ended up looking depending on which base color I chose and how much of each color I added to the chevrons. The purple-based one seemed contemporary and festive, while the orange-based one reminded me of Indian corn, and the yellow-based one reminded me the long, hot dog-days of summer.  That's how I ended up with different "themes" for the focal piece of each card.

    Scroll down to see close-ups of each card, and list of supplies you'll need to create your own.


    This bird card could really be used for a lot of occasions.  I'm making some cards for a friend to use, so I chose a simple  "thinking of you stamp" for the inside of the card, and left the outside free of sentiments. Supplies: In Color Card Stock, Whisper White Cardstock, Bird Builder Punch, Rhinestones, Dimensionals, Tag Topper Punch, Button (this one is retired, but we have plenty to choose from here), In Color Ribbon (retired), White Baker's Twine, Corner Rounder Punch


    I loved the funkiness of this card and thought it would make a great birthday card.  Supplies: In Color Card Stock, Whisper White Cardstock, Rhinestone, White Baker's Twine, Flower Punch, Sprinkles of Life Stamp Set, Paper Piercer, Paper Piercing Guide, Paper Piercing Mat, In Color Ribbon (retired), Tree Builder Punch, Dimensionals.


    And finally, a simple fall-themed card.  I chose to use a "Happy Thanksgiving" stamp inside, but any fall, Thanksgiving or Halloween-themed sentiment would do, or you could even leave it blank.  The pumpkin was made of punched-out pieces of cardstock...three ovals of the same size, the leaves from the bird punch, and the stem is the branch from the Tree Builder Punch.  Supplies: In Color Cardstock, Whisper White Cardstock, In Color Ribbon (retired), Oval Punch, Tree Builder Punch, Bird Builder Punch, Dimensionals
     
    If you'd like to purchase the pumpkin card, you are more than welcome to swing by my Etsy shop!

    I hope this was a fun post for you and got your mind racing with options! Thanks for checking in on me today!  Happy stamping!


    Thursday, August 27, 2015

    June 2015 My Paper Pumpkin Kit


    The My Paper Pumpkin kits just keep getting cuter and cuter!  Even though my kit parts are used up now (except some twine), I can’t wait to play with this stamp set even more.  I have so many ideas swimming in my head – check back to see if any of them make it on to paper!  This kit took me a little longer to assemble than they normally do, but it was so worth the extra time.  This kit is from June, 2015, and so far refills or duplicate kits have not been made available, but it’s always a possibility, so keep your eyes peeled.  Even if you don’t have the kit, though, there are definitely plenty of points of inspiration here!  The twine and faceted buttons are part of our regular lineup and can be purchased on my website (Vintage Faceted Buttons and Linen Thread) the color combination of whites, browns, corals, greens and turquoises is oh-so-yummy and the layout could be mimicked pretty easily.  Not to mention the good reminder to create your own background by stamping images repeatedly.  There were four other cards that came in this kit, but I ran out of time so I’ll have to post them when I get them done!  Hope you’re having a great week.  Until next time, happy stamping!

    Wednesday, August 26, 2015

    Weekly Deals 8/25/15 to 9/1/15


    We hope you enjoy this week's Weekly Deals!
    130698G


    Pansy Punch Item # 130698
    Regular Price: $16.00 US/$20.00 CAN
    Discounted Price: $12.00 US/$15.00 CAN
    133756G


    Silver Stampin' Glitter Item # 133756
    Regular Price: $4.00 US/$5.00 CAN
    Discounted Price: $3.00 US/$3.75 CAN


    Gold Glimmer Paper Item # 133719
    Regular Price: $5.00 US/$6.25 CAN
    Discounted Price: $3.75 US/$4.69 CAN


    Sweetheart Punch Item # 133786
    Regular Price: $16.00 US/$20.00 CAN
    Discounted Price: $12.00 US/$15.00 CAN


    Very Vanilla 5/8" Satin Ribbon Item # 134550
    Regular Price: $7.00 US/$8.75 CAN
    Discounted Price: $5.25 US/$6.56 CAN


    Eclectic Paper-Piercing Pack Item # 133778
    Regular Price: $8.00 US/$10.00 CAN
    Discounted Price: $6.00 US/$7.50 CAN

    Saturday, August 22, 2015

    Another Flower Patch Card


    Yesterday, I shared with you one of the cards I made for the bridesmaids in my wedding party. Today, I wanted to show you more cards I made using the exact same supplies, but a different layout. These were the cards that accompanied the gifts we got our mothers.  It was fun to have a coordinating suite of paper products to use for gift-giving and thank you notes!  Hope you have a great Saturday...I'm getting ready to head out and weed before the rain moves in.


    Supplies used: Stampin' Up! cardstock in Calypso Coral, Whisper White and Old Olive; Stampin' Up! ink in Old Olive, and Calypso Coral; adhesive-backed pearl, paper snips, Flower Patch stamps.

    Friday, August 21, 2015

    Flower Patch All-Purpose Card


    Flower Patch is one of my favorite stamp sets that Stampin' Up! currently sells.  As soon as I saw it, I knew I wanted to use it for my wedding stationary.  One of my wedding colors was Calypso Coral, so I combined it with Old Olive and made these cards for my bridesmaids...I made coordinating gift bags and wrote a special note to each of my girls and gave it with their gifts.  They loved them.  As I mentioned, the stamp set is Flower Patch, and there is a coordinating die set.  Stampin' Up offers them together in a bundle for 15% less than what you would have paid for the stamps and dies individually.  Nice, right? I have the die set and I love it, but I chose to hand cut the flowers this time to eliminate the slight white border the dies leave behind. I also used some retired ribbon, an adhesive pearl, the zig zag textured impressions embossing folder, and some retired designer series paper.

    TIP: when handcutting images like these, I use small, pointy & sharp, good quality scissors such as our Paper Snips.  Also, I turn the paper I'm cutting rather than turning the scissors as I cut.  This helps make better rounded edges.  Finally, I don't open and close the scissors a lot, and I'm smooth when I do.  Instead, I open them wide and cut until they are all the way closed and then open it again smoothly.  This helps prevent jagged edges from where you start and stop your cuts.  Also, I love to add a little extra surprise by decorating the inside, like this:


    If I've inspired you to create something fun with this set, and you need the supplies to do it, I'd be grateful if you ordered from me HERE!

    If you'd rather just purchase the card, you're in luck - it's listed in my Etsy store.

    Until next time, happy stamping!!!

    Thursday, August 20, 2015

    Lotus Thank You


    I don't know about you, but  I go through Thank You cards faster than any other kind of card, so I like to have plenty on hand.  However, recently, I had run out so I wanted a quick way to replenish my stock, but I didn't want it to look just slapped together, either.  Even though this card is simple, the layers of stamping, a small amount of bling, and good balance made this card come together quickly but still beautifully!   While this stamp set, Lotus Blossom, is retired, this card could easily be adapted to any color scheme, any sentiment, and any stamp set.  It lends itself particularly easy to any floral set.  Quick, and easy!  You'll notice I used a rounded corner and similar layout on the inside to tie the card together:


    If you would like to purchase items to make cards like these, please check out my stamping store.

    If you would rather purchase the card, come check out my Etsy Shop: xoStudioDesigns.

    Friday, August 7, 2015

    Sprinkles of Life - Rainy Day Encouragement


    Last month, I hosted a class using the Sprinkles of Life stamp set and the coordinating Tree Builder Punch.  This is one of the cards we made.  I really loved this set, and wanted to use it in a class because of it's versatility- there are sentiments ranging from friendship to birthday to encouragement, and playful & creative ways to use the cloud shape as a cloud, frosting, ice cream or greenery, and even the cupcake base could double as a basket.  Very clever.  So anyway, to highlight the encouragement sentiment, I chose this sentiment and the cloud.  I decided to use the 2014-2016 In Color cardstock for my rain drops (which were punched with the Tree Builder Punch and covered with Crystal Effects).  I also used Silver Embossing Powder to create a little texture & shiny interest on the clouds and sentiment.  I hand-drew the dotted lines for the rain drops using a Basic Gray marker, and used the Triple Banner Punch and Corner Rounder Punch to add more interesting details to my card.  I based it loosely on a card I had seen on Pinterest.  It had used a retired shower set (Rain or Shine) from Stampin' Up! but I thought it could be easily adapted to suit this set as well.  Unfortunately, I can't find it to give the person proper credit (I'm sorry if that's you..let me know, and I'll give you credit!).  I hope you enjoyed this quick and easy encouragement card. If you like what you see here and want to purchase any of the items (or other Stampin' Up! products), just click on the product name and it will take you straight to my store!  Thank you and happy stamping!

    Wednesday, August 5, 2015

    Fall "Thinking of You"


    When I made yesterday's card, I had heat embossed & hand-cut these leaves with the intention of putting them behind the ribbon.  But, I decided it was too much, and opted not to use them.  But, I didn't want my hard work to go to waste, so I created this card to use those leaves.  I think it turned out nice.  It's a pretty simple card, besides the fussy cutting, but because of the variety of patterns and layers it looks pretty fancy.  The paper and the leaf stamps are retired.  But we there are some pretty papers and stamps coming out in a month that would be perfect for creating this card.  The "thinking of you" stamp is from Teeny Tiny Wishes.  And the banner tails were cut with my most frequently used punch: the Banner Triple Punch.

    Tuesday, August 4, 2015

    Sketch Challenge - Mojo Monday #409


    Today was a big day for Stampin' Up! demonstrators.  You see, today we get to start ordering from the new Holiday Mini Catalog.  One of the perks of being a demonstrator is getting new products in our hands about a month before the general public.  The idea is that we would use that month to create projects to show our customers and design classes, workshops and make-n-takes around them....but sometimes, I'll be honest, I end up just starting at it because it's all so beautiful and I don't want to cut into the luscious paper and get my stamps dirty!

    I'll be placing my first order from the Holiday mini soon, but decided to get out some of my unused seasonal items from the past few years and play with them until I get can get my grubby little hands on something new.

    I looked to the Mojo Monday sketch challenge for the layout of my card.  My original intention was to stamp and hand-cut some leaves to put behind the ribbon on the left hand side, but I decided it was just too much.  So I left it a little simpler.  This card is a great example of how you can keep stamping to a minimum for those times you don't want to get all your supplies out or have limited products to work with.  The paper is retired (from last year) and the buttons are, too.  But I promise you - you will LOVE this year's fall paper (which would work great in re-creating this card)...it's gorgeous and I will be ordering it, so keep your eyes peeled for new projects using it. The buttons are also retired but we do have plenty of pretty buttons in our current catalog, and there will be some beautiful fall embellishments that would work in place of the button. This was the first chance I had to play with our new 5/8" Striped Cotton Ribbon.  I love that it's a bit wider than most of our current ribbon, and that it's thin, which makes it easy to use for different applications.  It's also a little less formal than some of our other ribbons, which I liked for this card.  The sentiment is from Teeny Tiny Wishes, which is my go-to stamp set.  There's a stamp for seemingly every occasion and they are small enough to fit just about anywhere. The button was threaded with our simple & rustic Linen Thread.

    I hope you enjoyed my interpretation of the sketch.  You should challenge yourself to play along.  If you do, leave me a link to your blog or gallery in my comments so that I can come see your work! :) Come back tomorrow to see another card I made using these materials. Happy stamping!

    If you'd like to purchase this card - or other cards and products, please check out my Etsy shop HERE.

    Pin It button on image hover